Sweetheart Cuff
I've decided to post a tutorial every Tuesday. Hopefully I will follow through with it. If you would like to see past tutorials, just go to the top of my blog, and click on Tutorials, or you can click on Tutorials under Labels. But since this is the first tutorial for this blog, you won't find much yet.
If you don't want to make this bracelet, but you want it, you can buy it for $10.00 plus S&H.
As you are well aware, Valentine's Day is approaching. So in the spirit of gifts and all things pink, I've done a pretty cuff bracelet made out of memory wire. So let's get to it then...
First things first...you need all of your materials and tools.
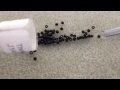
1. Memory Wire of course.You will need to get the regular sized memory wire, but I will talk about how to make it a little smaller if you don't want it to move around on your wrist.
2. Assortment of Beads-Whatever your little heart desires.
3. Eye Pins- You will need two, unless you mess up like I did, then you will need three.
4. Tools-Memory Wire Cutter. Please please please don't use regular cutters on memory wire, it will chew them up. You will also need Round Nose Pliers and Chain Nose Pliers (which aren't in the picture).
 Okay, lets make this bracelet.
Step 1. Cut your memory wire. If you have the smaller wire, you will just cut one complete ring. But if you are using the regular sized wire, you are going to want to cut it a bit smaller. I'd say you'd probably want about 1-1 1/2 inches less than a complete ring. Make sense? Whatever you do, make sure every cut is the same length. You will cut 15! And how, you are wondering do make it smaller? Why bend it of course! You don't want to really bend it so there are elbows in your wire. Just take the two end pieces and stretch them in toward eachother, and your circle will still be perfect. And when you put the whole thing together, it pulls the wire in to make it smaller, so no worries.

(okay, so I only have five here, but you get the idea)
Step 2. Now you are going to make a loop at one of the ends of all your pieces using your Round Nose Pliers. This is where your chain nose pliers come in. You will need them to make your loop really small. You don't want a big loop because we will be sliding it onto an eye pin, and if it is too big, it will slide all over the place.

All your pieces should look like this.

Step 3. Load your beads onto the wire. This is tedious and takes a while, but it's the easiest part! After your beads are on the wire, using your Round Nose Pliers, make a loop at the end of the wire, completing your ring.

Step 4. Now you are going to use your eye pins. Since you have fifteen pieces, you will want to separate them into three sets of five. Then you will start loading each set onto one of the eye pins. First, you will want to put a seed bead on the eye pin, then put on each of the pieces, separating each one by a seed bead. After all fifteen rings are on the eye pin and there is a seed bead on both ends, you will take your Round Nose Pliers and Make a loop on the straight end to finish the one side of the cuff.

Here, I have separated each of the sets to show you. What you can't see are the seed beads in between each of the wires, but they ARE there, I promise. (Please excuse my awful nailpolish)
Step 5. This is the most difficult step of the whole process. But luckily it's also the last step. After you have all of your wire on the eye pin, you will need to separate the sets like I have done in the previous picture. Here's the hard part. You will need to braid the sets. When do you stop braiding? When you can't braid anymore. It really doesn't look like a tight braid in the picture, but since we are dealing with wire here, it really is tight. Make it tight keeps the wires in place. You will only braid a couple of times before you can't braid it anymore. Okay, so I lied, that actually wasn't the hard part (unless you don't know how to braid). The hard part is now. You will need to take the remaining eye pin and load all of the wire and seed beads on them. It can be difficult to keep your wires in order. It would be nice to have three hands, so if you have someone around to help, grab them. Otherwise, just load slowly and you'll get there! I didn't have help and did just fine. After everything is loaded on your eye pin, before you make your remaining loop, make sure everything looks okay and stays put.
And there you have it.

And here is a variation of this bracelet: I made this one with two sets of six and just twisted them. My sister made this bracelet after I put up the tutorial and had a great idea. Remember the hard part when you are loading everything onto the eye pins. Well, to keep them organized she just slipped each set onto an eye pin, then when she needed to transfer them over to the eye pin everything will be on permanently, she just took them off one by one and it was much easier. Way to go Jenny!